
Author Archives: Tara Kate
3D MODELLING – VFX 2016
Final showreel:


During our VISUAL EFFECTS unit we were shown how to create simple sets in Maya, After Effects and Auto Desk.
We were shown things such as Screen Replacement and adding created objects into footage, During our unit we had been taught alot about colour correction and also Camera Tracking.
I originally planned to create a version of Chappie based on this tutorial we were shown in class:

my original Chappie worked well up until it came to rendering, where my issue was I rendered on a slow software and it couldn’t handle the size of the file, it was an enjoyable piece i wish to create again one day, In future I will stick to editing on one computer instead of switching between loads of different ones.
After this I had worked on a still engine that I was going to include into a moving car footage, This seemed particularly difficult, and had also failed during rendering.
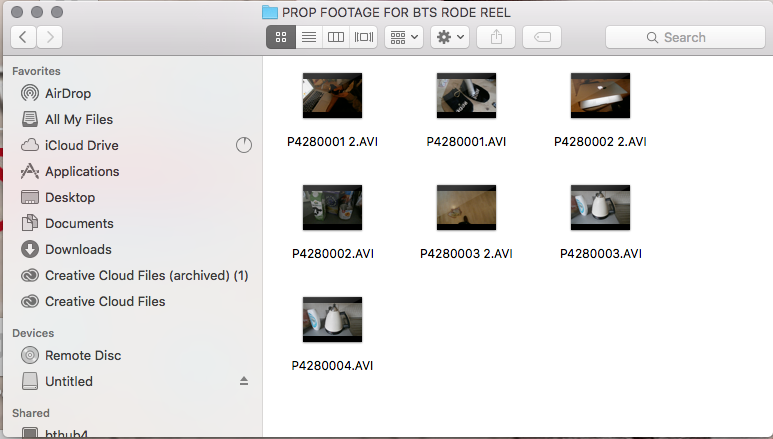
Once we had done this I had taken it upon myself to give up, But after watching multiple tutorials I worked on a simple set creating threee house hold objects, A cup, A plate and a Vase. (see images above)
The vase was to be the difficult piece that I wanted to include a lot of geometry and placing it into one filmed piece, During this footage it didnt film as best as I would liked and I yet again found myself with alot of complications.
Using three different types of camera tracking softwares I found blender to be easiest, Once this didnt work I chose to use 3 different still images (as seen in my video)
Camera tracking in the softwares was an important skill to learn as the camera tracking really brings a realistic feel to the shots we have.
We learnt this in class and it was a fun experience.
During class the screen replacements were really interesting to know and I used the screen replacement skill in a film I created for a competition which I felt really excelled what I had learnt in class
During the use of the still images it became easier to place them in using Maya,
During peer feedback I found the objects I had created were interesting and usable, I used this peer feedback when choosing which textures to use and how to make my objects seem realistic.
The locations I used were to fit the objects.
I enjoyed placing the plate into the original backdrop as the reflections really made the plate stand out.
The finished plate cup and vase really impressed me once I added all the shadows, reflections and materials, I enjoyed the plate the most and it was the most realistic one of my objects.
During our time in class we had learnt to use Layers, this came in handy when rendering out for our breakdown videos, Layering is important in 3d modelling as it comes in handy when wanting to know where everything was, In Blender layering is difficult, but in Maya it proved alot simpler and alot more effective, I went wrong in using blender as it was what I was used to and knew alot about, However Maya has shown to be alot more easier and more effective.
In the future I will be using Maya.
My own personal feedback:
I spent alot of time putting effort into the thought of my process rather than the actual physical aspect of creating it which i thought I shouldn’t of done towards the end, Now the unit is over, In my spare time I will try and put more effort into creating something fun and enjoyable.
I enjoyed creating a film character as Maya made it easy and more understandable,
Please View this word document for the rest of my SA2. (if there are any issue please email and I shall relink the page due to current issues with wordpress mobile. Microsoft)
Taking photos of my different areas for my still images made my work look simple, I believe my work would of looked better with footage;
My Rode Reel

My Rode Reel is a competition free for all, It has basic requirements such as, your film must be an original film,Three Minutes or Less.
You should also include a Behind The Scenes Video, Three minutes or less and that in your film you should use at least one piece of certified Rode Equipment, which in the BTS you will show it being used and how.
Planning My Rode Reel:
The story plan:
In my story, I will be noting the little (but funny) things in life that really affect us.
I will be starting with a male getting into bed after sorting everything out for work, He sets his alarm for 6am and falls asleep.
Next morning, He wakes and finds his alarm didn’t got off, its 9am and he has 12 missed calls from his manager! He finds his work laptop didn’t charge over night so hes extremely angry and annoyed! off he goes to work; Fast forward to him coming home to a red card from the post office! More stress! goes to make a cup of tea, The kettle is empty!! how annoying! pours a bowl of cereal; no cereal! opens the fridge to find an empty bottle of milk. By now you can visably tell he has had enough of the day.
He has a sit down to do some scratch cards he brought… losing on every single one of them, he gives up, tears them up and throws them to the ground. He starts again by ensuring his alarm is set, laptop is charged and writes a shopping list.
Location:
a house and area.
Scenes: After filming my cinematography in order and it went well, I have chosen to do that exact same order this time.
SCENE 1:
MALE STARTS BY PUTTING WORK LAPTOP ON “CHARGE”, SETTING ALARM. GETTING INTO BED.
SCENE 2:
MALE WAKES TO FIND ITS 9AM, ALARM DIDNT GO OFF -MALE PANIC- FINDS WORK LAPTOP SWITCH WASN’T ON 12 MISSED CALLS FROM MANAGER
SCENE 3:
HE GOES OFF TO WORK; SHOT OF A ROYAL MAIL RED CARD COME THROUGH THE DOOR.
SCENE 4:
HE COMES HOME, FINDS THE CARD: MORE STRESS.
GOES TO MAKE A CUP OF TEA AND BOWL OF CEREAL; (NO CEREAL!) (NO WATER IN THE KETTLE)
NO MILK MORE STRESS.
SCENE 5:
SITS DOWN TO DO SCRATCH CARDS, LOSES ON EVERY SINGLE ONE.
VISIBLY ANNOYED BY TODAY, HE TEARS THEM UP.
SCENE 6:
HE ENDS THE DAY BY ENSURING HIS ALARM IS SET AND LAPTOP IS CHARGED.
How long will this take me to film?:
As I will be filming in chronological order I believe it’ll roughly take me half an hour to an hour to film properly.
How long do I believe the film will be (My Rode Reel requires 3 minutes or less):
I will aim for 2 minutes and 30 seconds but hope to go over to 3 minutes.
During filming & editing:
BEHIND THE SCENES; RODE REEL:
LOCATION:
Sandpiper Close
14 Sandpiper close
Kitchen
Bedroom
PROPS:
LAPTOP
BEDROOM PROPS
PHONE
KITCHEN APPLIANCES
EMPTY CEREAL BOX
EMPTY MILK CARTON
SCRATCH CARDS
ROYAL MAIL MISSED POST RED CARD
EDITING PROCESS:
As I’m filming in order of the film, the editing process will be quick and easy.


Organising each footage piece in order and files.
Here I am editing the first scene; The angle has been shot at a point on view
During editing I found having them in chronological order really helped, I began by putting all the scenes shot in order unedited on my time line using Premier Pro.
I then went over the scenes one by one, Hoping to only have 5-6 scenes as the film cannot go over 3 minutes, It would not take long to edit them scene by scene, Once one scene was edited I would place it on the time line labeled finished, To then edit the next scene and snap them together, Once I had done two scenes and snapped them together I would watch them back to ensure two scenes were done. I then did that for all the scenes and went over it all when it was finished.
Sound:
in regards to the sound with it being a Rode Reel production and Rode being a microphone distributor they would hope the sound would be clear and clean, Using a rode mic, that I will show in my BTS/EPK The sounds I will have are as following:
alarm sound
wind
Male voice in anger
Male voice huffing puffing
Kettle sounds
Kitchen equipment clanking sounds
scratch card sounds
carton sounds
bedroom prop sounds
My sounds will be sourced during filming, I will aim to only have recorded on set sounds with no online sourced sounds, During the behind the scenes I will film the process getting the sounds also.
During editing I will place sounds in once the film is completed, Again with the sounds I will record them in chronological order and label them in order. Im hoping itll work out the same with the scenes.
Using rode equipment I expect the sounds to be film ready, I also hope to only record the sounds once.
As you can see here, I have put everything in order ready to snap together,
the editing was easy, I kept it neutral and not including much fancy transitions, I aimed to colour grade as Id be filming with natural light,
BEHIND THE SCENES:
In my behind the scenes; I will be showing:
Props used
Locations used
Rode equipment used
Shots of the rode equipment being used
the editing process of the film on screen
OVERVIEW:
As we had to follow the rode reel competition rules it was a slow process to meet the criteria, We had to plan a film and the behind the scenes of the film.
I spent a while planning a film that would include alot of interesting behind the scenes footage for our EPK, having to use certified RODE equipment aswel, we had to plan that into our films also.
During my filming process I had tried to include the rode equipment in as much as possible, This is shown in my EPK, During filming it was only myself there to film which made filming behind the scenes difficult, I opted for point of view for my EPK and would use sub titiles to show what I had done, I would begin by showing my props and how I had set them out ready for the filming process and explain there how to do it.
I would start by showing PROPS in my bts, This would include what prop and where it will be seen, The same with locations.
During editing I will be editing in order it was shot, and hopefully shooting in order it will take me a rough day to ensure everything is perfectly edited and ready for upload.
Having to edit two films seems like it would take ages but if filming in chronological order helps, I’m doing everything possible to film in order for both.
Having written down both orders for filming, I will start filming my behind the scenes before filming the actual film, I will then add the scenes I can film during actual filming for my behind the scenes.
The issues I came across when filming included not having the actors during the day and only being able to film in the evening, it was a rush to get everything done before it turned dark and ruined my morning looking shoot.
Including that I had only myself as crew which made it very difficult to get behind the scenes and filming done at the same time, using one camera and having to jump between filming two different films.
During editing I found it difficult to stick to adding ym sound in as when recorded it sounded very shaky.

Cinematography 2 – SA1/2
Cinematography Piece.
we were given a unit to produce and shoot a 2 minute long cinematography piece.
As we had to use black magic cinema cameras we had to show a range of different techniques, Such as:
– Focus pulling –
Depth of field (perspective, shallow, deep, occlusion)
– Movement (Tracking, parallax, handheld, dolly)
– Considered Framing ( thirds, quadrants)
– considered colour palette (clothing, lighting, background)
– lighting ( available, additive, subtractive, reflected)
– Exposing to the right (ETTR)
in photography and optics, a neutral density filter orND filter is a filter that reduces or modifies the intensity of all wavelengths or colors of light equally, giving no changes in hue of colour rendition. It can be a colorless (clear) or grey filter.
A waveform is the shape and form of a signal such as a wave moving in a physical medium or an abstract representation. In many cases the medium in which the wave is being propagated does not permit a direct visual image of the form.
In our films we had to also involve inverse square law this the way light hits a surface depending on the distance between the light and the object. With this if the object is further away it wont be as bright! We tested this using a subject.


In this arrangement of images I have shown the use of different light in different settings and the use of GOBOS.
My refilmed film is a dark shaded film about stalking.
I had previously asked if I could use a BMCC pocket and a wide lense as I felt it would work perfectly with the locations I had planned and my story.
Unfortunately I couldn’t get the needed equipment due to emails not being read. This meant receiving the wrong equipment.
During my filming I had an issue of the lense not being wide enough, I however worked around this.
During my editing it found it difficult to colour grade after my whites blew out! With no time to re do it I just went with it.
With doing the film on my own j felt like I could of done with the help, but I also feel like the film went okay.
With little equipment I felt the lighting should be better but I went around this by ensuring I was filming two stops to the right
PLANNING:
I planned to film in a location that was outside for most of my shots but without the right lense I chose to do inside filming.
DAY ONE:
I used the loction of a house to show deifferent lighting, Using different angles to show a certain eerieness to the shots.
with the choice of sound for a film like this being minimal I used a freesound from (freesound,org) labelled (horror music, genwing)
During my film I would of done alot of things different but because I filmed on my own (due to no assistance avaliable) it was very constricting.
I didn’t include a focus pull due to lack of help which i would of wanted in there.
During my edit i realised i possibly hadn’t filmed enough, So i chose to add infills and voiceovers, another issue was i didnt have the extra voiceover i wanted due to being let down last minute for both the plan and back up plan.
I enjoyed the story but would of liked a more informative story, as i feel my story doesnt quite get the point across.
I noticed after filming i had continuity when it came to filming on a table, I would go back and fix that at a later date.
Having filmed on my own and missing an actor i Had to step in but set the camera on a tripod and left it be, which i felt worked okay
During editing I filmed in secenque so I didnt have to place the shots in order, that worked well when it came to editing which i planned before filming,
I would like some feedback to ensure how i felt about the film which is where I will add here:
Having used a blackmagic camera and editing on premier i felt it worked well and during the editing process i felt filming in sequence definitely helped.
My first draft of editing became 3 minutes long, which was difficult to cut to 2 minutes and get the story across, Within 2 minutes I got the scenes in that I wanted and finished it on exactly 2 minutes.
Having 2 minutes for a story is difficult and does take alot of planning, with more planning I could of hit 2 minutes in my first draft, The difficult part of editing is going under or over the given time.
With the different angles used I wanted to ensure I got a creepy feel; In this i felt I achieved that in a shot where the male is looking at a page, I chose to use an over the shoulder shot and including a side of head shot, The only issues I felt I had with angles is not viewing everything, especially in the phone selection, i also miss judged the focus involved but still feel it worked perfectly fine.
Including shots with cars was difficult with a smaller angle lense but felt ikt still worked okay, Including focus.
During the edit I felt i elongagted some of the “pointless” shots and it dragged on, but worked well with the music timing.
I felt I learnt alot about angles that I could use involving my next pieces.
SOUND DESIGN

1.


2

3
This is the sound plan indicating the sound elements and where they appear in my design of the 1993 film intro of Falling Down.
my sound plan includes, time codes in and out, what the sound is, weither it is Spotfx, Foley, ADR or Atmosphere and notes including, Recorded/Sourced. What they’re recorded with, and how they were recorded. Here I have included an arrangement of images that show how I recorded my self generated sounds.
I used a condensing microphone created by Tonor due to having difficulties in acquiring proper recording equipment from the college.
I found using this microphone quite handy and enjoyed the use of it. I also used a H2N for some sounds in the college. These sounds were however rushed and didn’t sound as good as I hoped.
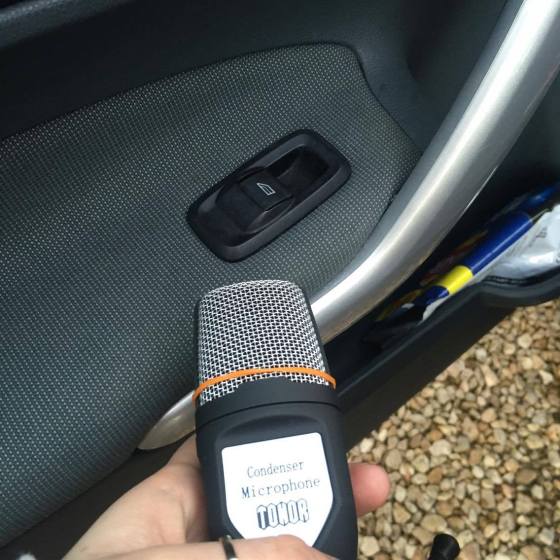
Here I am showing how I got the sounds for the character clicking his Air Conditioning, I used the window button in a ford fiesta.

this is an image to show how the microphone stood.
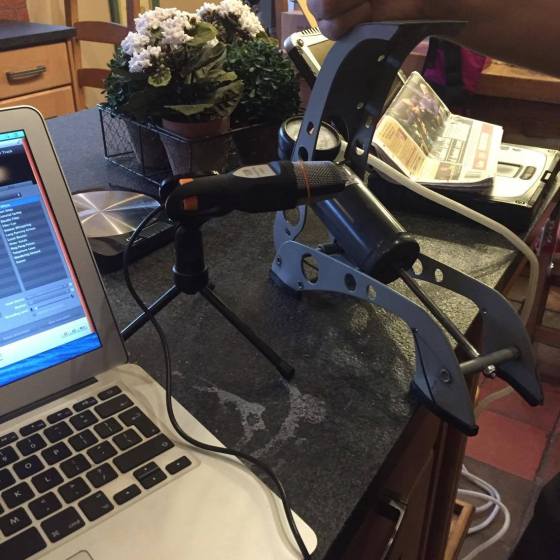
This image is to show my use of foley in the production of my sound design, Here I am using an Air filter pumping system to create the sounds of a broken window winder handle.
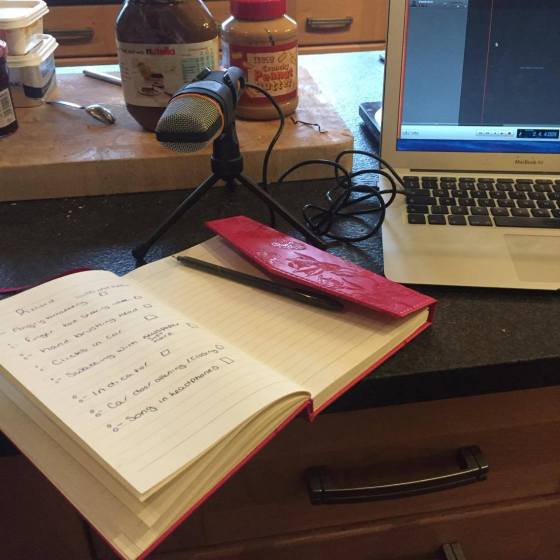
Here is an image to show the basics of my set up when creating some sounds inside the house.
The used microphone.

In order to achieve the sound of the swatting of the fly in a car, here I used a newspaper and a chopping board to create the dense thud sounds such as you would hear in a car.

Inside a car I used garageband and the microphone to achieve some of the door sounds required.

In order to create the sound of an exhaust or even a harsh blow of wind I had someone use an electronic cigarette to blow into the microphone, The achieved sound was really good.

I also included the sound of inhaling air flow to add to the atmosphere, I enjoyed this sound as i could use it for many different things.
i used it as an atmospheric sound and was extremely impressed with the outcome.

Using a fan part from an old boiler system we tried to create a sound for the broken window winder, this didn’t work so well but the sound was still used as a atmosphere sound.

Using a sqweaky stool in the kitchen, I had managed to achieve sounds that were similar to a old squeaking car. This sound worked well and I enjoyed mixing it.
During our sound production unit we had learnt about multiple uses of microphones;

4
D Ma. (2010). Microphone use. Available: https://www.google.co.uk/search?q=microphone+use&biw=1433&bih=802&source=lnms&tbm=isch&sa=X&ved=0ahUKEwjWnpfFkK3LAhXra5oKHfCIAdAQ_AUIBygC#imgrc=NEwPaKxj2kBMBM%3A. Last accessed 20 september.
Looking at this table we had to following during our time learning about different microphones and placements and uses, we had learnt small but very important things to do with our recording time
we had learnt that spaced pairs aren’t friendly for film production, as spaced pairs have phasing issues delaying sound from one sound to the other, making it difficult during editing, this could also make the film sound not up to film quality.

this is a example of part of the panning I have done for the 5.1, This is a sound I wanted to project through out all of the 5 speakers.
 6
6
Here is how a starting pan is first like, set to left and right.
in this setting you can create the sounds to come from any speaker you want, 5.1 is a basic surround sound set.
During this we had to learn direction of sound, this bases from what you, the watcher, could be focussing on as to whats in the scene.
For example:

in this scene, from Star Wars: The Forces Awakens. Viewers would be focussed on the main object in the scene, obviously the Light Sabre, which has its own sound. you’d cut out all other sounds when the object is central to the shot. when the object moves to spin to the right, you’d hear the light sabre ‘sound’ more so in the right speaker. This is described as direction of sound, this also helps the audience to follow the sound.
another important part of sound is shaping the sound to the narrative, Using Star Wars: The Forces Awakens again as an example, Upon watching Star Wars: The Forces Awakens, you’ll quickly catch on to the iconic sound of a lightsabre which as been a popular toy since the saga began, Now once the sound is set to the object it quickly fits. Now Imagine a lightsabre sounding like a pig squeal. Doesn’t make sense in a saga set in the futuristic era.
https://en.wikipedia.org/wiki/Lightsaber#Sound
This link is here to give you more insight as to how, Ben Burtt (A famous sound designer) created the iconic sound.
8
 9
9Here is a shot of the work station you will have when you work on audition to mix, here I am showing that I am mixing one sound to the video. The sound is panned essentially to the right.
In audition there is 4 modes to edit in;
Read: the mode used to go through your mix.
Write: the mode used to write your mix.
Touch: the mode used to go through a written mix but where you can only change one thing
Latch: the mode used to go through and change things without editing the saved pieces
 10
10Here is a select piece of the film intro Falling Down, I worked on. I began in premiere where I timed the sounds to the shots, This was proved difficult as in premiere you can only edit by frame making it quite difficult to properly time up short sounds such as a Car honk or the foley required for the brushing through the hair clips.
As we mixed to 5.1 surround sound, dolby digital, the file extensions we’d be working towards were AC3 files, AC3 is a file extention for surround sound audio files for DVDS this particular file extention was created by dolby labs.
as for our video that would be an MPEG 2 file.
During the sound mix we would be learning about things such as the use of reverbs, In my selection of Falling Down there wasn’t much areas for use of reverb but I attempted it in the form of the sound of traffic, Reverb is a frequency dependent piece, During a reverb the sound would effectively be sucked up by the area and come to a silent stop.
when learning about sound we had to learn about KHZ to, we learnt that 48 khz is the standard for DVD sounds.
we had also learnt that bit rate affects dynamic range.
WAV – Windows format
AIFF- Apple Format.
a sound design team will often compromise of 5 groups:-
Foley
Atmosphere
Sfx
ADR
Music
In our edits we mainly had foley, atmosphere and sfx as we were told to concentrate more on the sounds than we should the ADR which meant most of our edits did not have dialogue.
referencing my sourced sounds:

Freesound.org, Offtheline, morning sounds.
11

freesound.org, GowlerMusic, Radio Static.
12

freesound.org, wikusv, idle engine with revs.
13

freesound.org, niedec, downtown traffic and crowd noises.
14

freesound.org, yacou, children shouting.
15

Freesound.org, Sengjinn, Jackhammer Drill.
16
I sourced my sounds from freesound.org
Reflecting on my own work:
During the edit I chose to not watch the original and try to work out as best as possible what it could sound like and working towards it sounding as much as the original as possible. I noticed when I had finished I was completely off but still quite impressed with my finished piece.
I ran into equipment issues during the recording of my sounds and had no other option but to use one microphone throughout the whole thing, I had use of a different microphone for about two sounds, which didn’t sound as good as i wanted due to having rushed time to use the equipment.
I chose to find artistic ways for my foley sounds, Having used multiple different tools from the back of a british gas van I was impressed with the different sounds I could achieve by using broken or old pieces of rubbish.
when we were given the project we were also given another project along side that shared the same deadline, meaning it came across rushed in the beginning, We were then given an extra 5 week deadline due to the college not having the actual equipment fit for the deadline, this gave us extra time to put a little more effort involved in the work. I still came across equipment issues.
Having then done the edit at home on a personal computer due to having to concentrate on other projects this was the only way I could of finished the project. I then came across the issue of the college computers having not been updated they couldn’t open my finished project, this meant, due to the college also having issues updating, I had to restart the whole edit 2 days before the deadline and have it finished in a day. Therefore I personally think the finished piece is awful, I enjoy sound design and I’m absolutely devastated this happened.
During the mix I found the sounds easy to edit and mix using Adobe Audition, the panning system required to be used in 5.1 was easier to use than I thought, It was a learning curve but I felt I could of done with more time using the mixing software.
During my edit I turned a lot of the sounds down as I felt they were too overpowering to the sounds I had recorded myself, In premiere I had used keyframes to induce Exponential Fades, Whereas in Audition I had the option to turn the sound up and down manually whilst mixing and saving.
I found the panning for 5.1 really enjoyable and easy to figure out.
When it came to working along side a plan I felt I worked quite happily along side it it went perfectly apart from the last hurdle.
I will be posting my finished piece for viewing once I have received feedback from my tutors on the work to go along side the finished piece.`

Just here I will be placing my finished piece and the feedback I have gathered from the practitioners/employers in the industry once my work has been shown or evaluated by the tutors in the up and coming few weeks.
————————————————————————————————————————————————————————————-
Harvard Referencing System – Sourced Sounds.
–
1 – 2
Brooksby Melton College. (2015). Sound Design. Available: https://moodle2.brooksbymelton.ac.uk/pluginfile.php/10872/mod_resource/content/1/Sound%20Design%20Assignment%20Brief.pdf. Last accessed 7th March 2016.
5-6
Adobe Audition software used to edit the mix.
(george lucas. (2016). Lightsaber – Sound. Available: https://en.wikipedia.org/wiki/Lightsaber#Sound. Last accessed 20th january.)
Adobe Premiere, used to edit the sounds.
Freesound.org:
Offtheline – morning sounds. 20th February 2016
Gowler Music – Radio Static. 20th February 2016
Wikusv – Idle Engine with revving. 20th February 2016
niedec -Downtown traffic and crowd noises. 20th February 2016
yacou -Children Shouting. 20th february 2016
sengjinn – Jack Hammer and Drill. 20th february 2016
SA1 – EXTERNAL LIVE BRIEF – DePict
Pitching for DePict competition.


Begin the pitch with what competition you’re entering,
Image, Depict talk
What they want
image, talk
what they require
image, talk.
How you’ve researched it
looking into other films similar, with dream sequences
THE STORY:
A lady/gentleman, wakes up same time everyday, hearing sounds of disorder out the window, panics and runs to it! nothing there, a normal bird song day.. ends the day, wakes up again, in a panic to a normal bird song day, dream sequence inbetween of the disorder outside.
Until one morning, He/she wakes up one day, to the disorder sounds, opens the curtain and its actually happening!
how you will fit a video into 90 seconds
Placing each piece of the video in ten seconds each
audience
15 on wards
test place/will you test?
bedrooms/rotoscoping
props/actors
bedrooms/family
budget?
software
filming plan/timing?
two three days
PITCH FOR DEPICT:
RENEWED PAPER WORK.
Story change:
My depict story has changed due to not having the amount of time required for the editing process of the disorder and destroyed village outside the window.
I came up with a different Idea due to changing location and everything where I was to film, My new story is:
NEW DEPICT STORY AND STORY PLAN APRIL 2016:
for depict our story must be 90 seconds, ( a minute and a half), Some may find this difficult but it helps challenge a film maker into thinking of a well filmed story.
New Story:
My new story will show how people, Female deal with Vanity, I will base my film on the female getting ready.. showing her love for herself… to then show the male getting himself ready, With news reports of the word “selfie” and “vain” being added to the oxford dictionary, Toward the end, a voice over will question, Are we happy with our looks? It will be about the demons we face in being vain
Location:
A dark desolate room for the girl to get ready in
A bright shining room for the male to get ready in
Scenes:
Filmed in chronological order.
SCENE 1:
Shot of the female at a mirror preparing herself for the long process of putting make up on
Voice over: Vain.
SCENE 2:
The famle is forever changing on slight thing about herself, just once… then again
SCENE 3:
Female coninuting to persist with her looks, The sound to releasea demonic sound,
SCENE 4:
ending with females finished look
HOW LONG WILL IT TAKE FOR ME TO FILM:
Aa the film will be 90 seconds long I am hoping for filming (especially with animals) to take roughly an hour.
MY FILM WILL BE:
90 seconds long. (1 minute 30 seconds)
DURING FILMING AND EDITING:
Scenes will be in chronological order which will make editing quick and easy.
LOCATION:
Desolate room in Brooksby melton college
home, Bedroom
PROPS:
Make up
Mirrors
candles
SCREEN SHOTS OF EDITING PROCESS:
ISSUES AROUND FILMING:
During the filming I was on my own, This meant i couldn’t piece sound together just as I wanted, Instead I had used voiceovers and music to fit the moment
OVERVIEW:
As the film had to be 90 seconds it was difficult to get the whole story into the small amount of time, I feel if I had more time to film I could of done this better, However it was my fault for not giving myself enough time to film.
During filming I wanted to use music instead of sound, this also proved difficult but i felt it ended fine.
I enjoyed this piece and felt it could fit well into 90 seconds.
EDITING PROCESS:

during editing as you can tell I only had a few shots which made the editing alot easier, especially when they were all filmed in chronological order, With the sound I chose to continue the same three sounds throughout to show consistency in the sound.
feedback:
“The shots were shot really clear and understandable, The sound was loud could of done with being quieter, However I understood from the story it was about vanity and demons, it could of been abit clearer with a voice over or a title, other than that it was a clearly shot short, When you have a moment you should build on the story as I believe it would be a nice finished piece with a strong story”

Here I have shown footage in the folder I used, Most of the shots here were not used in my film and could be used again to create a longer piece once I have the correct sound;
PASSWORD: depict2016

I had based my film off of the sin “vanity” and I wanted to get across that vanity and demons go hand in hand, Which is why in the shots it shows the actress with a full face of make up but still applying more.
During filming I found it difficult to get correct angles and proper colouring which is why I went for black and white to add the feel so sin and disorder.
As it took a few shoots to ensure the story would fit into 90 seconds it was difficult to try and process an actual story, Which i feel didn’t work as well as I wanted, I will aim to give myself more time next time to think of a story that will work strongly within 90 seconds.
The lighting in the film originally came from the windows but felt like it was too bright for the feeling I was trying to get across, This is why in the film theres alot of candles, They created the soft light seen on the pale skin tones of the actress.
When changing my old story to the new one I was hoping to still bring some 3D to the scenes but didn;t leave myself enough time to edit it in.
During the editing process it was quick to edit. which i felt didnt work very well but I’m still happy with the finished piece. Next time I enter depict I will give myself enough time to fit a strong story into 90 seconds
EQUIPMENT LIST:
BLACK MAGIC POCKET CINEMA CAMERA
BOOM POLE
RODE MIC
ADOBE EDITING SOFTWARE.
During the use of the black magic I found the raw footage alot easier to process and edit, This however didn’t come to use as I feel I ran out of time and proceeded on with the black and white feel to add feeling where I may have missed an obvious editing process.
When recording sound I was hoping to use what I recorded with the boom pole and rode mic, However I believe there was too much pressure involved when recording as the boom pole did not work, when adding the sound it didn’t fit and sounded too far away, This meant filling it with sound from
FreeSound.org
Mysticmanaged; 2014. Horror song.
Demonvoice, 2004. MJUK
Whispers in the dark. 2015.DRIVEBY
SA1 – CINEMATOGRAPHY

Protected: SA2 – CINEMATOGRAPHY
SA2 – SOUND DESIGN

Design, plan, testing and final product for SOUND DESIGN.
Clip chosen: Falling Down intro. 4 minutes 45 seconds.
PLANNED TIME CODING:
TEST SOUNDS:
OFFICIAL USED SOUNDS:
EDITING SCREEN SHOTS:
Cinematography -2 minute piece/sound 6/11/15
Sound: – 2
